日期:106年5月3日~6月21日
時間:每週三下午
地點:新北市教研中心
公文與計畫:
課程主題:Angular
講師:林士立老師
【5月3日】:
【學習資源】【5月3日】【5月10日】【5月17日】【5月24日】【5月31日】【6月7日】【6月14日】【6月21日】
課前預習:
開發環境與工具:
- Visual Studio Code (1.13.1)
- Node.js (v6.11.0 LTS, v8.1.2 Current)
- WebStorm (2017.1.4)
- Git (2.13.1)
- Angular CLI
- GitHub – angular/angular-cli: CLI tool for Angular
- Angular Augury
安裝開發環境與工具
- 安裝 nodejs
- 安裝開發工具 (WebStorm)
- 安裝 Git
- 安裝 Chrome 擴充功能:Angular Augury
安裝 Angular CLI
npm install -g @angular/cli //@類似 namespace 功能

ng -v
ng new demo --routing

cd demo

npm install @angular/language-service --save-dev

ng -v
執行專案專屬的 TypeScript 編譯程式
- .\node_modules\.bin\tsc
- 編譯 src\main.ts 為 src\main.js
- -w : 持續監視 src\main.ts,一有變動,就立即編譯
.\node_modules\.bin\tsc src\main -w
【5月10日】:
【學習資源】【5月3日】【5月10日】【5月17日】【5月24日】【5月31日】【6月7日】【6月14日】【6月21日】
課前預習:
更新 Angular CLI
angular-cli 更新到 1.0.2 版了,更新步驟如下:
global 版本更新:
npm uninstall -g @angular/cli
npm cache clean
npm install -g @angular/cli@latest
查看 angular-cli 版本( 專案目錄之外執行 ):
ng -v
————————————————————
舊版 angular-cli 產生的專案內的版本( local )更新:
注意!!
以下指令要在專案根目錄下執行,也會升級其他 package
Linux or Mac
rm -rf node_modules dist
Windows 命令提示字元
rmdir /S/Q node_modules dist
Windows PowerShell
rm -r -fo node_modules,dist
所有作業系統
npm install –save-dev @angular/cli@latest
npm install
單獨升級專案內的 angular-cli
npm uninstall @angular/cli –save-dev
npm install –save-dev @angular/cli
查看 local angular-cli 與 angular 相關 package 版本( 專案目錄下執行 ):
ng -v
使用 Angular 2 開發 TodoMVC 應用程式完整實作教學
操作指令:
ng new todomvc
cd todomvc
code . ==> 啟用 Visual Studio Code,並開啟當前所在的資料夾(todomvc)
cd ..
git clone https://github.com/coolrare/todomvc-template.git
- 複製 todomvc-template/assets/css 資料夾至 todomvc/src/assets 下
- 開啟 todomvc-template/index.html 將內容整個複製至 todomvc/src/index.html 內做編輯。
- 將原 todomvc-template/index.html 中 <head> 中的內容:
- <title> 取代 原 todomvc/src/index.html 中的 <title>
- 兩個 <link> 複製至原 todomvc/index.html <head> 中
- 將原 todomvc-template/index.html 中 <body> 的內容取代 todomvc/src/app/app.component.html 中的內容。
npm start ==> 啟用網頁伺服器 http://localhost:4200,並監視網頁更新情形,一有更新立即重新編譯,並更新網頁
ng g c title
ng g c rooter
ng g pipe filter
ng g service data
課程活動:
講義:Angular 簡介
參考網站:不專業網管筆記 | 林士立老師

實作:
範例程式下載:https://drive.google.com/drive/folders/0B_wx0SuvjnGWd1pyZmY3Zi1memM
參考資料:
- Angular Extension Pack:Popular Visual Studio Code extensions for Angular Development – Will 保哥
- 範例程式檔:https://bitbucket.org/t301000/toh-ntpc-coder-2017
- WebStorm 設定調整
操作指令及步驟:
- ng new toh-demo –routing (注意:routing前有兩個 – 號)
- 開啟 WebStrom
- npm start => 啟用網頁伺服器 http://localhost:4200,並監視網頁更新情形,一有更新立即重新編譯,並更新網頁
- 範例檔案下載解壓縮至專案根目錄下
- ng g c navbar (ng generate component navbar) => 產生 src/app/navbar 資料夾
installing component
create src\app\navbar\navbar.component.css
create src\app\navbar\navbar.component.html
create src\app\navbar\navbar.component.spec.ts
create src\app\navbar\navbar.component.ts
update src\app\app.module.ts
- 將範例檔 heroes.html 中<nav> (含)網頁內容取代 navbar.component.html 中所有的網頁內容。
- 將範例檔 heroes.html 下列資料複製至 index.html 相對位置
<link rel="stylesheet" href="https://cdnjs.cloudflare.com/ajax/libs/twitter-bootstrap/3.3.7/css/bootstrap.min.css">
<script src="https://code.jquery.com/jquery.js"></script>
<script src="https://cdnjs.cloudflare.com/ajax/libs/twitter-bootstrap/3.3.7/js/bootstrap.min.js"></script>
- ng g c heroes
installing component
create src\app\heroes\heroes.component.css
create src\app\heroes\heroes.component.html
create src\app\heroes\heroes.component.spec.ts
create src\app\heroes\heroes.component.ts
update src\app\app.module.ts
- 將範例檔 heroes.html 中 <div class="container"> (不含)網頁內容取代 heroes.component.html 中所有的網頁內容。
- ng g cl Hero
installing class
create src\app\hero.ts - 複製 mock-heroes.ts 至 src/app 下
修改 heroes.component.html 內容
<!-- 清單 -->
<div class="list-group">
  <a class="list-group-item my-item" *ngFor="let hero of heroes">
    <span>{{ hero.id }}</span>{{ hero.name }}<span class="badge">X</span>
  </a>
</div>
<!-- 清單結束 -->
hero.ts 內容
export class Hero {
  id: number;
  name: string;
}
app.component.html 網頁內容
<app-navbar></app-navbar>
<div class="container">
  <app-heroes></app-heroes>
</div>
Angular 系統運作說明:
main.ts 說明:
import { enableProdMode } from '@angular/core';
import { platformBrowserDynamic } from '@angular/platform-browser-dynamic';

import { AppModule } from './app/app.module';
import { environment } from './environments/environment';

if (environment.production) {
  enableProdMode();
}

platformBrowserDynamic().bootstrapModule(AppModule);
app.module.ts 說明:
import { NgModule } from '@angular/core';
import { BrowserModule } from '@angular/platform-browser';
import { FormsModule } from '@angular/forms';
import { HttpModule } from '@angular/http';
import { CommonModule } from '@angular/common';
import { AppRoutingModule } from './app-routing.module';

import { AppComponent } from './app.component';
import { NavbarComponent } from './navbar/navbar.component';
import { HeroesComponent } from "./heroes/heroes.component";

@NgModule({
  declarations: [
    AppComponent,
    NavbarComponent,
    HeroesComponent
  ],
  imports: [
    BrowserModule,
    FormsModule,
    HttpModule,
    CommonModule,
    AppRoutingModule
  ],
  providers: [],
  bootstrap: [AppComponent]
})
export class AppModule { }
app.component.ts 說明:
import { Component } from '@angular/core';

@Component({
  selector: 'app-root',  // HTML Tag
  templateUrl: './app.component.html',  // 樣板網頁置於另一個檔案
/*
  template: `<app-navbar></app-navbar>`,  // 樣板網頁內容置於倒單引號「`」中
*/
  styleUrls: ['./app.component.css']
})
export class AppComponent {
  title = 'app works!';
}
【5月17日】:
【學習資源】【5月3日】【5月10日】【5月17日】【5月24日】【5月31日】【6月7日】【6月14日】【6月21日】
課前預習:
- Angular 核心概念簡報:https://drive.google.com/drive/folders/0B_wx0SuvjnGWd1pyZmY3Zi1memM
- JavaScript:[線上讀書會] andy 主講 javascript 入門 火力加強版
- TypeScript:[線上讀書會] TypeScript 入門 – 拉拉 主講
- Angular 2 開發實戰:進階開發篇 – RxJS 新手入門
上課講義:
- 講義、範例檔、錄影檔:http://bit.ly/toh-ntpc-coder2017
- Angular 啟動流程
- Angular 開發環境建置 & angular-cli
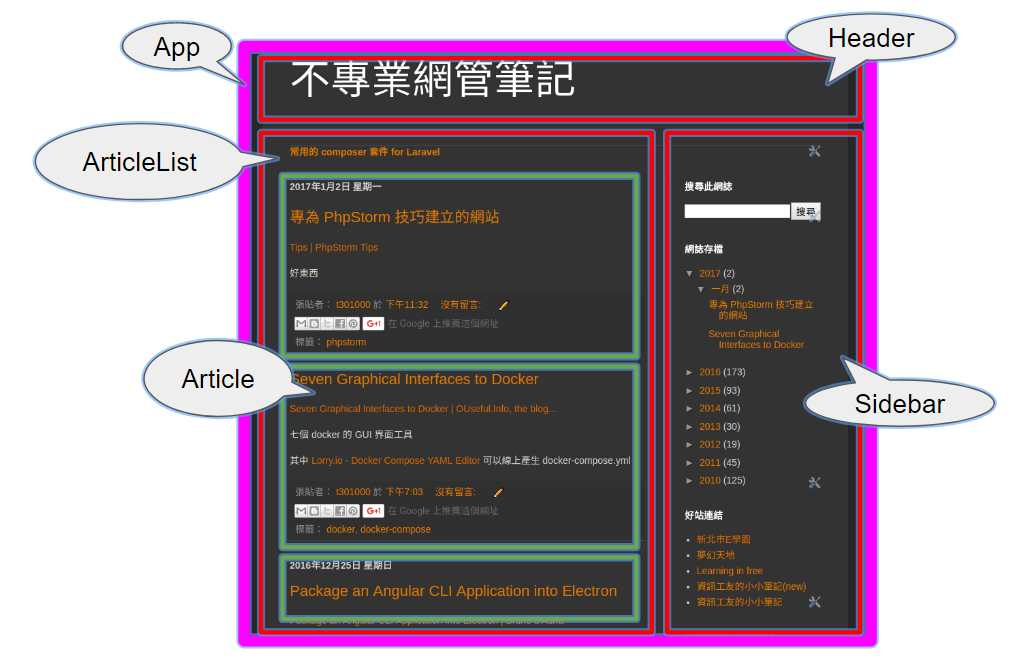
- Component 概述&Decorator
- data binding 資料繫結
Angular2 Binding: 組合鍵
keydown.a
keydown.b
keydown.c
keydown.dot
keydown.Spacebar
keydown.meta.Enter <= meta: Windows Key
keydown.alt.Enter
keydown.control.Enter
keydown.shift.Enter
keydown.meta.o
keydown.meta.s
keydown.meta.f
keydown.escape
keydown.ArrowLeft
keydown.ArrowRight
keydown.ArrowUp
keydown.ArrowDown
keydown.0
keydown.1
keydown.2
keydown.3
keydown.4
keydown.5
keydown.6
keydown.7
keydown.8
keydown.9
使用 keyup 也行,只是觸發時間點不同而已。
課堂練習及習作解答:僅供參考
app.component.html
<h1>{{title}}</h1>
<input type="text" #newurl (keydown.control.enter)="changeUrl(newurl.value)">
<button (click)="changeUrl(newurl.value)">submit</button>
<img [src]="url" [width]="w">
<hr>
寬:{{divx}}<input type="range" min=0 max=200 [value]="divx" style="width: 200px;" [(ngModel)]="divx">
高:{{divy}}<input type="range" min=0 max=200 [value]="divy" style="width: 200px;" [(ngModel)]="divy">
<br>
<div style="border: 1px red solid;" [style.width.px]="divx" [style.height.px]="divy"></div>
app.component.ts
import { Component } from '@angular/core';
@Component({
 selector: 'app-root',
 templateUrl: './app.component.html',
 styleUrls: ['./app.component.css']
})
export class AppComponent {
 title = 'app works!';
 url = 'https://angular.io/resources/images/logos/angular/angular.svg';
 w = 100;
 divx = 100;
 divy = 100;

 changeUrl(newUrl) {
   this.url = newUrl;
 }
}
【5月24日】:
【學習資源】【5月3日】【5月10日】【5月17日】【5月24日】【5月31日】【6月7日】【6月14日】【6月21日】
分享重點:
- Angular 中的 css 樣式處理
- NgIf 、 NgFor 、 NgSwitch 家族
上課講義:
- 講義、範例檔、錄影檔:http://bit.ly/toh-ntpc-coder2017
- Angular 啟動流程
- data binding 資料繫結
- Attribute、class、style binding
- NgIf、NgFor、NgSwitch 基礎
- Directive 指令、Pipe 管道
- NgModule 概述、Service 服務與 DI 依賴注入
- 父子 Component 之通訊
Directive 中文參考資料:
- Angular Directive 初探 – Part.1
- Angular Directive 初探 – Part.2
- Angular Directive 初探 – Part.3
- Structural Directive @ 線上讀書會
參考資料:
- Kendo UI for Angular
- Angular API 參考手冊
上課筆記:
app.component.html
<table border="2">
  <tr>
    <td [attr.colspan]="cols">1</td>
    <td>2</td>
  </tr>
  <tr>
    <td>4</td>
    <td>5</td>
    <td>6</td>
  </tr>
</table>

<br />

<div class="abc"
     [class.active]="active"
     [class.title]="active"></div>

<button (click)="active = !active">{{active}}</button>

<div class="abc active inactive"
     [ngClass]="getObj()"></div>

<textarea [(ngModel)]="msg" *ngIf="true"></textarea>

<textarea [(ngModel)]="msg" *ngIf="false"></textarea>
<textarea [(ngModel)]="msg" [hidden]="true"></textarea>

<button *ngFor="let item of array1" (click)="handle(item)">
  {{item}}
</button>

<br />

<button (click)="color='red'">red</button>
<button (click)="color='blue'">blue</button>

<div *ngIf="color==='red'; then thenblock; else other"></div>

<ng-template #thenblock>
  <div style="background-color: red; width: 100px; height: 100px;"></div>
</ng-template>

<ng-template #other>
  <div style="background-color: blue; width: 100px; height: 100px;"></div>
</ng-template>
app.component.ts
export class AppComponent {
  cols = 2;
  active = true;
  msg = '';
  array1 = ['aa', 'bb', 'cc', 'dd'];
  color = 'red';

  getObj() {
    return {
      active: this.active,
      inactive: !this.active,
      myTitle: true
    };
  }

  handle(m: string) {
    this.msg += this.msg ? (',' + m) : m;
  }

}
【5月31日】:
【學習資源】【5月3日】【5月10日】【5月17日】【5月24日】【5月31日】【6月7日】【6月14日】【6月21日】
上課講義、範例、錄影檔:
實作:
ng g c child
child\child.component.html
<h2>{{ title }}</h2>
<button (click)="send('msg from child');">點我!點我</button>
child\child.component.ts
export class ChildComponent implements OnInit {
  @Input() title = 'default child title';

  @Output() sendmsg = new EventEmitter<string>();

  constructor() { }

  ngOnInit() {
  }

  send(msg) {
    console.log(msg);
    this.sendmsg.emit(msg);
  }

}
ng g c counter-button
counter-button\counter-button.component.html
<button (click)="count();">{{ value }}</button>
counter-button\counter-button.component.ts
export class CounterButtonComponent implements OnInit {
  @Input('step') value = 1;

  @Output('changed') valueChange = new EventEmitter<number>();

  constructor() { }

  ngOnInit() {
  }

  count() {
    this.valueChange.emit(this.value);
  }

}
app.component.html
<app-child
  [title]="'this is new title'"
  (sendmsg)="log($event)">
</app-child>
<br>
<app-counter-button [value]="-2" (changed)="change($event);"></app-counter-button>
{{ counter }}
<app-counter-button [value]="+5" (changed)="change($event);"></app-counter-button>
app.component.ts
counter = 10;
log(e) {
  console.log(e);
}

change(v: number) {
  this.counter += v;
}
作業:

- 按下方圖塊,圖塊的顏色會顯示在上方
- 按下方圖塊的按鈕[edit],會出現按鈕[close]及色彩三原色(紅、綠、藍)拉霸,可混色為在其上方的圖塊顏色,原按鈕[edit]會消失。
- 按下方圖塊的按鈕[close],會出現按鈕[edit],原按鈕[close]及色彩三原色(紅、綠、藍)拉霸會消失。
◎林士立老師作業實作參考:
https://gist.github.com/t301000/fa692be5208abdf6b793e94901c20b57
邱昭士老師作業實作參考:
ng g c color-panel
color-panel\color-panel.component.html
<div style="width: 100px; height: 100px;" [style.backgroundColor]="getMyStyle()" (click)="setStyle()"></div>
<div *ngIf="edit; then thenBlock; else otherBlock"></div>
<ng-template #thenBlock>
  <button (click)="edit=false;">close</button>
  <input type="range" min="0" max="255" style="background-color: red;" [(ngModel)]="color.r">
  <input type="range" min="0" max="255" style="background-color: green;" [(ngModel)]="color.g">
  <input type="range" min="0" max="255" style="background-color: blue;" [(ngModel)]="color.b">
</ng-template>

<ng-template #otherBlock>
  <button (click)="edit=true;">edit</button>
</ng-template>
color-panel\color-panel.component.css
input[type="range"]{
  -webkit-appearance: none;
  overflow:hidden;     /* 限定範圍 */
  width:90px;
  height:15px;
  outline : none;      /* 避免點選會有藍線或虛線 */
  background:none;
}
color-panel\color-panel.component.ts
import {Component, EventEmitter, Input, OnInit, Output} from '@angular/core';

@Component({
  selector: 'app-color-panel',
  templateUrl: './color-panel.component.html',
  styleUrls: ['./color-panel.component.css']
})
export class ColorPanelComponent implements OnInit {
 edit = false;
 @Input() color = {r: 255, g: 255, b: 255};
 @Output() colorSet = new EventEmitter<string>();

 constructor() { }

 ngOnInit() {
 }

 getMyStyle() {
   return `rgb(${this.color.r}, ${this.color.g}, ${this.color.b})`;
 }

 setStyle() {
   this.colorSet.emit(this.getMyStyle());
 }

}
app.component.html
<table border="1">
  <tr>
    <td [attr.colspan]="colors.length">
      <div style="width: 100%; height: 100px;" [style.backgroundColor]="myColor"></div>
    </td>
  </tr>
  <tr style="vertical-align: top;">
    <td *ngFor="let color of colors">
      <app-color-panel [color]="color" (colorSet)="myColor=$event"></app-color-panel>
    </td>
  </tr>
</table>
app.component.ts
export class AppComponent {
  colors = [
    {r: 0, g: 0, b: 0},
    {r: 255, g: 0, b: 0},
    {r: 255, g: 255, b: 0},
    {r: 255, g: 0, b: 255},
    {r: 0, g: 255, b: 0},
    {r: 0, g: 255, b: 255},
    {r: 0, g: 0, b: 255},
  ];
  myColor = `rgb(255, 0, 0)`;

}
參考資料:
- Touch. Draw. Share:A Web Whiteboard
- Kendo UI for Angular
- https://github.com/t301000/toh-ntpc-coder2017
【6月7日】:
【學習資源】【5月3日】【5月10日】【5月17日】【5月24日】【5月31日】【6月7日】【6月14日】【6月21日】
上課講義、範例、錄影檔:
- 線上教學文件、錄影檔
- 線上 Demo 程式碼
https://github.com/t301000/toh-ntpc-coder2017 - 線上 Demo 站
https://t301000.github.io/toh-ntpc-coder2017 - 20170531 作業實做參考程式碼
https://gist.github.com/t301000/fa692be5208abdf6b793e94901c20b57 - Angular 線上讀書會 – Workshop Topic Outline (Basic) – 12 weeks
- NgModule 概述、Service 服務與 DI 依賴注入
【6月14日】:
【學習資源】【5月3日】【5月10日】【5月17日】【5月24日】【5月31日】【6月7日】【6月14日】【6月21日】
上課講義、範例、錄影檔:
- 教程:英雄指南
- 線上教學文件、錄影檔
- 線上 Demo 程式碼
https://github.com/t301000/toh-ntpc-coder2017 - 線上 Demo 站
https://t301000.github.io/toh-ntpc-coder2017
實作:
index.html
<!doctype html>
<html>
<head>
  <meta charset="utf-8">
  <title>Tour Of Heroes</title>
  <base href="/">

  <meta name="viewport" content="width=device-width, initial-scale=1">
  <link rel="icon" type="image/x-icon" href="favicon.ico">
  <link rel="stylesheet" href="https://cdnjs.cloudflare.com/ajax/libs/twitter-bootstrap/3.3.7/css/bootstrap.min.css">
  <!--[if lt IE 9]>
  <script src="https://cdnjs.cloudflare.com/ajax/libs/html5shiv/3.7.3/html5shiv.min.js"></script>
  <script src="https://cdnjs.cloudflare.com/ajax/libs/respond.js/1.4.2/respond.min.js"></script>
  <![endif]-->
</head>
<body>
  <app-root>Loading...</app-root>

  <script src="https://code.jquery.com/jquery.js"></script>
  <script src="https://cdnjs.cloudflare.com/ajax/libs/twitter-bootstrap/3.3.7/js/bootstrap.min.js"></script>
</body>
</html>
app.component.html
<app-navbar></app-navbar>

<div class="container">
  <router-outlet></router-outlet>
</div>
app-routing.module.ts
import { NgModule } from '@angular/core';
import { Routes, RouterModule } from '@angular/router';

import { HeroesComponent } from './heroes/heroes.component';
import { DashboardComponent } from './dashboard/dashboard.component';
import { PageNotFoundComponent } from './page-not-found/page-not-found.component';
import { HeroDetailComponent } from './hero-detail/hero-detail.component';

const routes: Routes = [
  {
    path: '',
    redirectTo: 'heroes',
    pathMatch: 'full'
  },
  { path: 'heroes', component: HeroesComponent },
  { path: 'heroes/:id', component: HeroDetailComponent },
  { path: 'dashboard', component: DashboardComponent },
  { path: '**', component: PageNotFoundComponent }
];

@NgModule({
  imports: [RouterModule.forRoot(routes)],
  exports: [RouterModule]
})
export class AppRoutingModule { }
hero.service.ts
import { Injectable } from '@angular/core';
import { Headers, Http, RequestOptions, Response } from '@angular/http';

import { Hero } from './hero';
import { Observable } from 'rxjs/Observable';
import 'rxjs/add/operator/map';
import 'rxjs/add/operator/catch';
import 'rxjs/add/operator/do';
import 'rxjs/add/observable/throw';
import 'rxjs/add/observable/of';

@Injectable()
export class HeroService {
  baseUrl = '/api/heroes';

  constructor(private http: Http) { }

  getHeroes(): Observable<Hero[]> {
    return this.http.get(this.baseUrl)
              .map((res: Response) => res.json().data || {})
              .catch(this.handleError);
  }

  addHero(name: string): Observable<Hero> {
    const headers = new Headers({
      'Content-Type': 'application/json'
    });
    const options = new RequestOptions({headers});
    return this.http.post(this.baseUrl, {name}, options)
              .map((res: Response) => res.json().data)
              .catch(this.handleError);
  }

  deleteHero(id: number): Observable<any> {
    return this.http.delete(`${this.baseUrl}/${id}`)
              .map((res: Response) => null)
              .catch(this.handleError);
  }

  getHero(id: number): Observable<Hero> {
    return this.http.get(`${this.baseUrl}/${id}`)
              .map((res: Response) => res.json().data || {})
              .catch(this.handleError);
  }

  updateHero(id: number, name: string): Observable<any> {
    const headers = new Headers({
      'Content-Type': 'application/json'
    });
    const options = new RequestOptions({headers});
    return this.http.put(`${this.baseUrl}/${id}`, {id, name}, options)
              .map(() => null)
              .catch(this.handleError);
  }

  searchHero(keyword: string): Observable<Hero[]> {
    return this.http.get(`${this.baseUrl}/?name=${keyword}`).do(() => console.log(keyword))
               .map((res: Response) => res.json().data as Hero[] || [])
               .catch(this.handleError);
  }

  private handleError(error: Response | any): Observable<any> {
    // console.log(error);
    let errMsg: string;
    if (error instanceof Response) {
      const body = error.json() || '';
      const err = body.error || JSON.stringify(body);
      errMsg = `${error.status} - ${error.statusText || ''} ${err}`;
    } else {
      errMsg = error.message ? error.message : error.toString();
    }
    console.error(errMsg);
    return Observable.throw(errMsg);
  }
}
hero.ts
export class Hero {
  id: number;
  name: string;
}
heroes.data.ts
import { InMemoryDbService } from 'angular-in-memory-web-api';
import { Hero } from './hero';

export class HeroDB implements InMemoryDbService {
  createDb(): {[key: string]: Hero[]} {
    const heroes: Hero[] = [
      {id: 11, name: 'Mr. Nice'},
      {id: 12, name: 'Narco'},
      {id: 13, name: 'Bombasto'},
      {id: 14, name: 'Celeritas'},
      {id: 15, name: 'Magneta'},
      {id: 16, name: 'RubberMan'},
      {id: 17, name: 'Dynama'},
      {id: 18, name: 'Dr IQ'},
      {id: 19, name: 'Magma'},
      {id: 20, name: 'Tornado'}
    ];
    return {heroes};
  }
}
heroes\heroes.component.html
<div class="page-header">
  <h1>My Heroes</h1>
</div>

<app-new-hero (createHero)="addHero($event)"></app-new-hero>
<hr />

<!-- 清單 -->
<div class="list-group">
  <a class="list-group-item my-item"
      *ngFor="let hero of heroes"
      (click)="selectedHero = hero"
      [class.active]="selectedHero === hero">
    <span>{{ hero.id }}</span>{{ hero.name }}
    <span class="badge" (click)="deleteHero(hero); $event.stopPropagation()"> X </span>
  </a>
</div>
<!-- 清單結束 -->
<div *ngIf="errorMessage">{{ errorMessage }}</div>
<app-mini-detail [hero]="selectedHero" *ngIf="selectedHero"></app-mini-detail>
heroes\heroes.component.ts
import { Component, OnInit } from '@angular/core';

import { Hero } from '../hero';
import { HeroService } from '../hero.service';

@Component({
  selector: 'app-heroes',
  templateUrl: './heroes.component.html',
  styleUrls: ['./heroes.component.css']
})
export class HeroesComponent implements OnInit {
  heroes: Hero[] = [];
  selectedHero: Hero = null;
  errorMessage: string = null;

  constructor(private heroService: HeroService) { }

  ngOnInit() {
    this.heroService.getHeroes()
        .subscribe(
          heroes => this.heroes = heroes,
          this.showError.bind(this)
        );
  }

  addHero(name: string) {
    this.heroService.addHero(name)
        .subscribe(
          hero => this.heroes.push(hero),
          this.showError.bind(this)
        );
  }

  deleteHero(hero: Hero) {
    this.heroService.deleteHero(hero.id)
        .subscribe(
          () => {
            this.heroes = this.heroes.filter(item => item !== hero);
            this.resetSelectedHero(hero);
          },
          this.showError.bind(this)
        );
  }

  private resetSelectedHero(hero: Hero) {
    if (this.selectedHero && this.selectedHero === hero) {
      this.selectedHero = null;
    }
  }

  private showError(error: string) {
    this.errorMessage = error;
  }

}
new-hero\new-hero.component.html
<div class="form-inline">
  <div class="form-group">
    <label for="name">Hero Name: </label>
    <input type="text" class="form-control" id="name"
           [placeholder]="hintWord" [(ngModel)]="name"
           (keydown.enter)="addHero()">
  </div>
  <button class="btn btn-primary"
          (click)="addHero()" [disabled]="!name.trim()">新增</button>
</div>
new-hero\new-hero.component.ts
import { Component, EventEmitter, OnInit, Output } from '@angular/core';

@Component({
  selector: 'app-new-hero',
  templateUrl: './new-hero.component.html',
  styleUrls: ['./new-hero.component.css']
})
export class NewHeroComponent implements OnInit {
  name = '';
  hintWord = 'New Hero\'s name';
  @Output() createHero = new EventEmitter<string>();

  constructor() { }

  ngOnInit() {
  }

  addHero() {
    const name = this.name.trim();
    if (name) {
      this.createHero.emit(name);
      this.name = '';
    }
  }
}
mini-detail\mini-detail.component.html
<h2>{{ hero.name }} is my hero.</h2>
<div class="btn btn-info" (click)="goDetail()">View Details</div>
mini-detail.component.ts
import { Component, Input, OnInit } from '@angular/core';
import { Hero } from '../hero';
import { Router } from '@angular/router';

@Component({
  selector: 'app-mini-detail',
  templateUrl: './mini-detail.component.html',
  styleUrls: ['./mini-detail.component.css']
})
export class MiniDetailComponent implements OnInit {
  @Input() hero: Hero;

  constructor(private router: Router) { }

  ngOnInit() {
  }

  goDetail() {
    this.router.navigate(['/heroes', this.hero.id]);
  }

}
navbar\navbar.component.html
<nav class="navbar navbar-inverse" role="navigation">
  <div class="container">
    <!-- Brand and toggle get grouped for better mobile display -->
    <div class="navbar-header">
      <button type="button" class="navbar-toggle" data-toggle="collapse" data-target=".navbar-ex1-collapse">
        <span class="sr-only">Toggle navigation</span>
        <span class="icon-bar"></span>
        <span class="icon-bar"></span>
        <span class="icon-bar"></span>
      </button>
      <span class="navbar-brand glyphicon glyphicon-text-background"></span>
    </div>

    <!-- Collect the nav links, forms, and other content for toggling -->
    <div class="collapse navbar-collapse navbar-ex1-collapse">
      <ul class="nav navbar-nav">
        <li routerLinkActive="active" [routerLinkActiveOptions]="{exact: true}">
        <!-- 路由連結 (不加上中括號的屬性繫結,只能繫結固定的字串資料) -->
          <a [routerLink]="['/']">Home</a>
        </li>
        <li routerLinkActive="active">
          <a [routerLink]="['/dashboard']">Dashboard</a>
        </li>
        <li routerLinkActive="active">
          <a [routerLink]="['/heroes']">Heroes</a>
        </li>
      </ul>
    </div><!-- /.navbar-collapse -->
  </div>
</nav>
【6月21日】:
【學習資源】【5月3日】【5月10日】【5月17日】【5月24日】【5月31日】【6月7日】【6月14日】【6月21日】
上課講義、範例、錄影檔:
- Angular官方中文版
- Angular官方中文教程:英雄指南
- Angular 2 開發實戰:進階開發篇 – RxJS 新手入門
- 30 天精通 RxJS 系列文章 – 2017 iT 邦幫忙鐵人賽
- 線上教學文件、錄影檔
- 線上 Demo 程式碼
https://github.com/t301000/toh-ntpc-coder2017 - 線上 Demo 站
https://t301000.github.io/toh-ntpc-coder2017
路由說明:
const routes: Routes = [
  //{ path: '', redirectTo: 'heroes', pathMatch: 'full'}, //pathMatch 預設值為 'prefix'
  {path: 'heroes', component: HeroesComponent},
  {path: 'heroes/hello', component: HeroHelloComponent}, //一定要擺在 'heroes/:id' 之前,否則會永遠比對不到,因為系統會誤認:id='hello'
  {path: 'heroes/:id', component: HeroDetailComponent},
  {path: 'dashboard', component: DashboardComponent},
  {path: '**', component: PageNotFoundComponent}
];
實作:
安裝 angular-in-memory-web-api
- npm i angular-in-memory-web-api –save-dev
- angular2系列教程(八)In-memory web api、HTTP服务、依赖注入、Observable
hero.service.ts
import { Injectable } from '@angular/core';
import { Headers, Http, RequestOptions, Response } from '@angular/http';

import { Hero } from './hero';
import { Observable } from 'rxjs/Observable';
import 'rxjs/add/operator/map';
import 'rxjs/add/operator/catch';
import 'rxjs/add/operator/do';
import 'rxjs/add/observable/throw';
import 'rxjs/add/observable/of';

@Injectable()
export class HeroService {
  baseUrl = '/api/heroes';

  constructor(private http: Http) { }

  getHeroes(): Observable<Hero[]> {
    return this.http.get(this.baseUrl)
              .map((res: Response) => res.json().data || {})
              .catch(this.handleError);
  }

  addHero(name: string): Observable<Hero> {
    const headers = new Headers({
      'Content-Type': 'application/json'
    });
    const options = new RequestOptions({headers});
    return this.http.post(this.baseUrl, {name}, options)
              .map((res: Response) => res.json().data)
              .catch(this.handleError);
  }

  deleteHero(id: number): Observable<any> {
    return this.http.delete(`${this.baseUrl}/${id}`)  // this.baseUrl + '/' + id
              .map((res: Response) => null)
              .catch(this.handleError);
  }

  getHero(id: number): Observable<Hero> {
    return this.http.get(`${this.baseUrl}/${id}`)
              .map((res: Response) => res.json().data || {})
              .catch(this.handleError);
  }

  updateHero(id: number, name: string): Observable<any> {
    const headers = new Headers({
      'Content-Type': 'application/json'
    });
    const options = new RequestOptions({headers});
    return this.http.put(`${this.baseUrl}/${id}`, {id, name}, options)
              .map(() => null)
              .catch(this.handleError);
  }

  searchHero(keyword: string): Observable<Hero[]> {
    return this.http.get(`${this.baseUrl}/?name=${keyword}`).do(() => console.log(keyword))
               .map((res: Response) => res.json().data as Hero[] || [])
               .catch(this.handleError);
  }

  private handleError(error: Response | any): Observable<any> {
    // console.log(error);
    let errMsg: string;
    if (error instanceof Response) {
      const body = error.json() || '';
      const err = body.error || JSON.stringify(body);
      errMsg = `${error.status} - ${error.statusText || ''} ${err}`;
    } else {
      errMsg = error.message ? error.message : error.toString();
    }
    console.error(errMsg);
    return Observable.throw(errMsg);
  }
}
heroes.data.ts
import { InMemoryDbService } from 'angular-in-memory-web-api';
import { Hero } from './hero';

export class HeroDB implements InMemoryDbService {
  const HEROES: Hero[] = [
      {id: 11, name: 'Mr. Nice'},
      {id: 12, name: 'Narco'},
      {id: 13, name: 'Bombasto'},
      {id: 14, name: 'Celeritas'},
      {id: 15, name: 'Magneta'},
      {id: 16, name: 'RubberMan'},
      {id: 17, name: 'Dynama'},
      {id: 18, name: 'Dr IQ'},
      {id: 19, name: 'Magma'},
      {id: 20, name: 'Tornado'}
    ];
 createDb(): {
   return {heroes: this.HEROES};
 }
}
heroes\heroes.component.html
<div class="page-header">
  <h1>My Heroes</h1>
</div>

<app-new-hero (createHero)="addHero($event)"></app-new-hero>
<hr />

<!-- 清單 -->
<div class="list-group">
  <a class="list-group-item my-item"
      *ngFor="let hero of heroes"
      (click)="selectedHero = hero"
      [class.active]="selectedHero === hero">
    <span>{{ hero.id }}</span>{{ hero.name }}
    <span class="badge" (click)="deleteHero(hero); $event.stopPropagation()"> X </span>
  </a>
</div>
<!-- 清單結束 -->
<div *ngIf="errorMessage">{{ errorMessage }}</div>
<app-mini-detail [hero]="selectedHero" *ngIf="selectedHero"></app-mini-detail>
heroes\heroes.component.ts
import { Component, OnInit } from '@angular/core';

import { Hero } from '../hero';
import { HeroService } from '../hero.service';

@Component({
  selector: 'app-heroes',
  templateUrl: './heroes.component.html',
  styleUrls: ['./heroes.component.css']
})
export class HeroesComponent implements OnInit {
  heroes: Hero[] = [];
  selectedHero: Hero = null;
  errorMessage: string = null;

  constructor(private heroService: HeroService) { }

  ngOnInit() {
    this.heroService.getHeroes()
        .subscribe(
          heroes => this.heroes = heroes, //成功 success ==> onNext
          this.showError.bind(this)       //失敗 error   ==> onError
                                          //已完成 completed ==> onCompleted
        );
  }

  addHero(name: string) {
    this.heroService.addHero(name)
        .subscribe(
          hero => this.heroes.push(hero),
          this.showError.bind(this)
        );
  }

  deleteHero(hero: Hero) {
    this.heroService.deleteHero(hero.id)
        .subscribe(
          () => {
            this.heroes = this.heroes.filter(item => item !== hero);
            this.resetSelectedHero(hero);
          },
          this.showError.bind(this)
        );
  }

  private resetSelectedHero(hero: Hero) {
    if (this.selectedHero && this.selectedHero === hero) {
      this.selectedHero = null;
    }
  }

  private showError(error: string) {
    this.errorMessage = error;
  }

}
app.module.ts
import { InMemoryWebApiModule } from 'angular-in-memory-web-api';
import { HeroService } from './hero.service';
import { HeroDB } from './heroes.data';
@NgModule({
  declarations: [
   ...
  ],
  imports: [
    ...
    HttpModule,
    InMemoryWebApiModule.forRoot(HeroDB, {delay: 500}), // must after HttpModule, default delay 500ms
    AppRoutingModule
  ],
  providers: [HeroService],
  bootstrap: [AppComponent]
})
export class AppModule { }
【學習資源】:
【學習資源】【5月3日】【5月10日】【5月17日】【5月24日】【5月31日】【6月7日】【6月14日】【6月21日】
上課講義:
- 講義、範例檔、錄影檔:http://bit.ly/toh-ntpc-coder2017
- Angular 啟動流程
- Angular 開發環境建置 & angular-cli
- Component 概述&Decorator
- data binding 資料繫結
- Attribute、class、style binding
- Directive 指令、Pipe 管道
- NgIf、NgFor、NgSwitch 基礎
- NgModule 概述、Service 服務與 DI 依賴注入
- 父子 Component 之通訊
投影片:Angular 2 新手急救站
投影片:Angular 2 開發實戰:進階開發篇 – RxJS 新手入門
【網路資源】
- Angular User Group Taiwan
- Angular 4 開發環境說明 by 保哥
- angular-cli GitHub
- TypeScript 官方網站
- TypeScript Handbook(中文版)
- Angular 官方網站
- Angular 官方中文版
- Angular 部落格
- 前端工程的夢幻逸品:Angular 2 開發框架介紹
- Angular 2 開發實戰:新手入門篇 實作環境說明
- Angular 2 開發實戰:新手入門篇 實作環境說明
- Will 保哥的技術交流中心 | Facebook
- 如何解決在 Windows 用 npm 安裝 TypeScript 之後 tsc 還是舊版的問題
- 複製物件或矩陣的值 :吳鳳萍老師實作心得
- 線上 Angular 讀書會 | Facebook
- 30 天精通 RxJS 系列文章 – 2017 iT 邦幫忙鐵人賽
- Reactive Programming 簡介與教學(以 RxJS 為例)
- Touch. Draw. Share:A Web Whiteboard
- Kendo UI for Angular
- 快快樂樂學 Angular 2 開發框架 – 保哥
- 快快樂樂學會 Angular 2 網站開發框架 (Modern Web 2016) – 保哥
- Angular 與 jQuery 共舞:整合第三方套件的技巧、陷阱與解決方案 – 保哥
- 使用 Angular 2 與 Firebase 實現 Serverless 網站架構 (JSDC.tw 2016) – 保哥
- 使用 Angular 2 Router 快速建構 SPA 網站 – 保哥
- Angular 2 新手急救站 – 保哥
- Angular 2 開發實戰_新手入門篇 ( 適用 Angular 2.0.0-final 版本 ) – 保哥
- Angular 2 開發實戰:進階開發篇 – RxJS 新手入門 – 保哥
- Angular 2 開發實戰_進階開發篇 (完整版) – 保哥
- 使用 TypeScript 駕馭 Web 世界的脫韁野馬:以 Angular 2 開發框架為例 – 保哥
- TypeScript 開發實戰:開發即時互動的 html5 websocket 聊天室應用程式 – 保哥
- JavaScript 物件導向觀念入門 v.s. TypeScript 開發實戰 (微軟實戰課程日) – 保哥
- 使用 Visual Studio Code 建構 JavaScript 應用程式 – 保哥
- 使用 ASP.NET 5 實戰開發雲端應用程式 – 保哥
- ASP.NET MVC 5 新功能探索 – 保哥
- ASP.NET MVC 6 新功能探索 – 保哥
- 保哥線上講堂:LINQ 快速上手
- 使用 JSON Server 快速建置 Fake REST API 服務 – 保哥
- Visual Studio 2017 新功能探索 (Study4.TW) – 保哥
- 初學者都該了解的 HTTP 通訊協定基礎 – 保哥
- 投影片
- Facebook 直播影片